
Whether you’re a seasoned DIY enthusiast or a homeowner looking to learn more about tongue and groove flooring, this blog post is your comprehensive guide. By the end, you’ll have a deeper understanding of this flooring option, the installation process, and how to maintain it for years to come. Let’s dive in and discover the beauty and functionality of tongue and groove flooring.
Introduction to Tongue and Groove Flooring
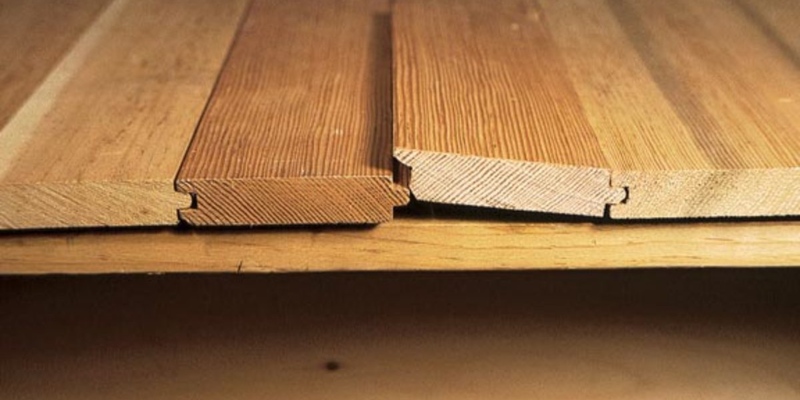
Tongue and groove flooring is a popular choice for homeowners looking to add beauty and durability to their homes. This type of flooring gets its name from the way the boards are designed to fit together, creating a seamless and secure installation.
The tongue and groove system consists of interlocking boards, where one edge has a protruding “tongue” that fits into a groove on the adjacent board. This tight connection helps to minimize gaps between the boards, resulting in a smooth and even surface.
One of the primary advantages of tongue and groove flooring is its stability. The interlocking design prevents the boards from shifting or separating, making it an excellent choice for areas with heavy foot traffic or high moisture levels. Additionally, the tight fit helps to reduce noise and provides a more solid feel underfoot.
Another benefit of tongue and groove flooring is its wide range of material options. From traditional hardwood to engineered wood, laminate, and even cork, there are various options to suit different preferences, budgets, and interior styles.
Tongue and groove flooring is known for its timeless appeal. Whether you prefer a classic, rustic look or a more modern aesthetic, there is a tongue and groove flooring option to complement any design scheme.
In the following sections of this blog post, we will dive deeper into the different types of tongue and groove flooring materials available, the installation process, maintenance and care techniques, as well as the pros and cons of choosing this type of flooring for your home.
By the end of this comprehensive guide, you will have a thorough understanding of tongue and groove flooring and all the information you need to make an informed decision for your home. So, let’s explore the world of tongue and groove flooring and discover the possibilities it offers in terms of beauty, durability, and functionality.
Types of Tongue and Groove Flooring Material
Tongue and groove flooring is available in a variety of materials, each with its own unique characteristics and benefits. In this section, we will explore the different types of tongue and groove flooring materials to help you make an informed decision for your home.
Hardwood
Hardwood tongue and groove flooring is a classic and timeless choice that adds warmth and elegance to any space. This type of flooring is made from real wood, providing natural beauty and durability. Hardwood options include popular species such as oak, maple, cherry, and walnut, each with its distinct grain patterns and colors. Hardwood flooring can be sanded and refinished multiple times, allowing for long-term use and versatility in design.
Engineered Wood
Engineered wood tongue and groove flooring is a versatile and cost-effective alternative to solid hardwood. It consists of a thin layer of real hardwood veneer bonded to a plywood or high-density fiberboard (HDF) core. This construction provides stability and resistance to changes in temperature and humidity, making it suitable for areas where solid hardwood may not be recommended, such as basements or kitchens. Engineered wood flooring comes in a wide range of wood species and finishes, allowing you to achieve the look of solid hardwood at a more budget-friendly price.
Laminate
Laminate tongue and groove flooring is a popular choice for those seeking a durable, low-maintenance option. It is made of multiple layers, including a high-density fiberboard (HDF) core, a photographic layer that mimics the appearance of hardwood or stone, and a protective wear layer. Laminate flooring is known for its affordability, scratch resistance, and easy installation due to its “floating” nature. It is available in a wide range of styles and finishes, offering versatility in design options.
Cork
Cork tongue and groove flooring is an environmentally friendly option that offers unique benefits. Harvested from the bark of cork oak trees, this material is renewable and sustainable. Cork flooring has natural insulation properties, providing warmth, comfort, and noise reduction. It is resistant to mold, mildew, and pests, making it an excellent choice for allergy sufferers. Cork flooring is available in a variety of colors and patterns, adding a distinctive and organic touch to any space.
Each type of tongue and groove flooring material has its own advantages and considerations. Consider factors such as your lifestyle, budget, and desired aesthetic when choosing the material that best suits your needs. In the following sections, we will delve into the installation process for tongue and groove flooring, ensuring that you have all the information you need to install your chosen material with confidence.
How to Install Tongue and Groove Flooring
Installing tongue and groove flooring requires careful preparation and attention to detail to ensure a successful and professional-looking result. In this section, we will guide you through the step-by-step process of installing tongue and groove flooring in your home.
Preparation of the Installation Area
Before you begin the installation process, it’s crucial to prepare the area where the tongue and groove flooring will be installed. Here are the key steps involved in the preparation:
- Measure the space: Accurately measure the area where the flooring will be installed to determine the amount of material needed. Consider adding a 5-10% extra for any mistakes or future repairs.
- Acclimate the flooring: Most flooring materials need to acclimate to the room’s temperature and humidity for a specified period. Follow the manufacturer’s instructions to ensure the flooring adjusts properly.
- Remove existing flooring: If there is existing flooring, remove it carefully, ensuring the subfloor is clean, dry, and level. Repair any damage or unevenness before proceeding.
- Install underlayment: Depending on the flooring material, you may need to install an underlayment. This layer helps with moisture protection, sound insulation, and provides a smoother surface for the tongue and groove flooring.
Tools Required for Installation
To install tongue and groove flooring, you will need a set of specific tools. Here are the essential tools typically used in the installation process:
- Tape measure and pencil: For accurate measurements and marking guidelines.
- Circular saw or miter saw: To cut the boards to the required lengths.
- Table saw or jigsaw: To cut boards for special fittings, such as around doorways or vents.
- Flooring nailer or stapler: To secure the tongue and groove boards to the subfloor.
- Rubber mallet: To tap the boards into place without damaging the edges.
- Pry bar and hammer: To remove any baseboards or trim if necessary.
- Level and straightedge: To ensure the floor is level and the boards are aligned correctly.
- Safety equipment: Gloves, safety glasses, and knee pads for protection during the installation process.
Installation Process
Once the preparation and tools are ready, follow these general steps to install tongue and groove flooring:
- Start with the first row: Begin by placing the first row of boards along the longest wall in the room. Ensure the groove side faces the wall, and leave a small gap between the boards and the wall to allow for expansion.
- Connect the boards: Fit the tongue of the first board into the groove of the second board at a slight angle. Use a rubber mallet to gently tap the boards together until they are snug. Repeat this process for the entire first row.
- Cut boards as needed: Measure and cut the last board of the first row to fit, leaving a gap between it and the wall for expansion.
- Continue with subsequent rows: Start the second row with a cut piece from the first row to stagger the joints. Connect the boards using the tongue and groove method, ensuring they are aligned and tightly fitted.
- Nail or staple the boards: Use a flooring nailer or stapler to secure the boards to the subfloor, placing the fasteners at an angle through the tongue. Follow the manufacturer’s instructions for proper spacing and positioning of the fasteners.
- Repeat the process: Continue installing rows of tongue and groove flooring, making sure to stagger the joints and maintain the desired pattern. Cut boards as needed to fit around obstacles or at the end of rows.
- Install the last row: Measure and cut the final row of boards to fit, leaving a small gap between the boards and the wall. Use a pry bar and hammer to tap the boards into place if necessary.
- Install trim and baseboards: Once the flooring is installed, reinstall or install new baseboards and trim to cover the expansion gap and provide a finished look.
Remember to refer to the specific installation instructions provided by the manufacturer of your chosen tongue and groove flooring material. These instructions may have additional details or considerations specific to the product.
In the next section, we will explore the maintenance and care techniques required to keep your tongue and groove flooring looking its best for years to come.
Maintenance and Care of Tongue and Groove Flooring
Proper maintenance and care are essential for preserving the beauty and longevity of your tongue and groove flooring. In this section, we will discuss the techniques and practices to keep your flooring looking its best.
Cleaning Techniques
Regular cleaning is necessary to maintain the appearance and cleanliness of your tongue and groove flooring. Here are some cleaning techniques to consider:
- Sweeping or vacuuming: Use a soft-bristle broom or a vacuum cleaner with a brush attachment to remove loose dirt, dust, and debris regularly. Avoid using vacuums with beater bars, as they can scratch the surface of the flooring.
- Damp mopping: For a deeper clean, use a well-wrung mop or a microfiber mop dampened with a mild floor cleaner specifically formulated for your type of tongue and groove flooring. Avoid using excess water, as standing water can damage the flooring. Follow the manufacturer’s recommendations for the appropriate cleaning solution.
- Spot cleaning: Clean up spills and stains immediately using a damp cloth or sponge. Avoid using harsh chemicals or abrasive cleaners that can damage the finish or penetrate the flooring material.
- Avoid excessive moisture: Minimize exposure to excessive moisture by promptly wiping up spills and avoiding wet mopping. Use mats or rugs in high-traffic areas, near entryways, and in front of sinks to absorb moisture and prevent damage.
Preventing Damage
Taking proactive measures to prevent damage will help maintain the integrity and appearance of your tongue and groove flooring. Consider the following tips:
- Use protective pads: Place felt or rubber pads under furniture legs to prevent scratches and indentations. Avoid dragging heavy furniture or appliances across the floor.
- Remove shoes: Encourage family members and guests to remove their shoes before walking on the tongue and groove flooring. This helps prevent dirt, grit, and sharp objects from causing damage.
- Use area rugs or mats: Place area rugs or mats in high-traffic areas, near entrances, and in front of sinks to protect the flooring from wear and moisture. Ensure that the rugs have a non-slip backing to prevent accidents.
- Control humidity levels: Maintain stable humidity levels in your home to prevent excessive expansion or contraction of the tongue and groove flooring. Use a humidifier in dry climates and a dehumidifier in humid environments as needed.
Repairing Scratches and Gouges
Despite your best efforts, scratches and gouges can occasionally occur on your tongue and groove flooring. Here’s how to address these issues:
- Minor scratches: For minor surface scratches, use a touch-up kit or a wood marker in a matching color to fill in the scratch. Gently buff the area with a soft cloth to blend the repair.
- Deeper scratches or gouges: For deeper scratches or gouges, fill the damaged area with wood filler that matches the color of your flooring. Follow the manufacturer’s instructions for application and drying time. Once dry, sand the area lightly and apply a protective finish to match the rest of the floor.
- Professional repair: If the damage is extensive or beyond your DIY repair skills, consider contacting a professional to assess and repair the flooring.
Regular maintenance and prompt attention to any damage will help extend the life and beauty of your tongue and groove flooring. In the next section, we will discuss the pros and cons of tongue and groove flooring to help you make an informed decision for your home.
Pros and Cons of Tongue and Groove Flooring
Like any type of flooring, tongue and groove flooring has its own set of advantages and disadvantages. Understanding these pros and cons will help you make an informed decision about whether this flooring option is suitable for your home. Let’s explore both sides of the equation.
Advantages of Tongue and Groove Flooring
- Durability: Tongue and groove flooring, especially when made from hardwood or engineered wood, is known for its durability and longevity. With proper care and maintenance, it can withstand heavy foot traffic and last for many years.
- Stability: The interlocking design of tongue and groove flooring provides excellent stability, preventing the boards from shifting or separating. This stability makes it an ideal choice for areas with high foot traffic or regions prone to temperature and humidity fluctuations.
- Aesthetics: Tongue and groove flooring offers a timeless and elegant aesthetic. With a wide range of material options, colors, and finishes, you can find the perfect style to match your interior design preferences.
- Easy Installation: Tongue and groove flooring is designed for straightforward installation. The interlocking system makes it easier to fit the boards together, and with the right tools and techniques, it can be a manageable DIY project.
- Versatility: Tongue and groove flooring is available in various materials, including hardwood, engineered wood, laminate, and cork. This versatility allows you to choose a flooring option that suits your budget, style, and functional needs.
Disadvantages of Tongue and Groove Flooring
- Cost: Depending on the material and quality, tongue and groove flooring can be more expensive than other flooring options. Hardwood, for example, tends to have a higher price point. However, keep in mind that the longevity and beauty of the flooring may offset the initial cost.
- Maintenance: While tongue and groove flooring is generally durable, it does require regular maintenance to keep it in optimal condition. This includes routine cleaning, preventing moisture damage, and addressing any scratches or gouges promptly.
- Susceptible to Moisture Damage: Although tongue and groove flooring can handle moisture better than some other flooring types, excessive moisture can still cause damage. It’s crucial to wipe up spills promptly and maintain appropriate humidity levels to prevent warping or cupping of the boards.
- Professional Repairs: While minor scratches or damage can be repaired by homeowners, extensive repairs may require professional assistance. This can add to the overall maintenance cost of the flooring.
- Limited DIY Options for Certain Materials: Some tongue and groove flooring options, such as solid hardwood, may require professional installation due to their specific requirements and the need for specialized tools.
By considering the advantages and disadvantages of tongue and groove flooring, you can determine if it aligns with your preferences, budget, and lifestyle. With proper care and maintenance, tongue and groove flooring can be a beautiful and long-lasting addition to your home.